
Home/Software/InputConfig/MIDI
Use a MIDI device to control your Mac
MIDI runs in both directions here, and neither direction needs a game controller. A keyboard, pad grid, or knob box can drive macOS on its own, and any control you own can play into a DAW through a virtual port.
This page has moved. The current version lives at the MIDI guide on inputconfig.com, which is kept up to date with every release.
Two directions
MIDI goes into InputConfig and out of it. Most people need one half, so start with the half that matches the gear on your desk.
Neither direction needs a game controller attached. A MIDI keyboard, pad grid, or knob box drives macOS on its own with nothing else plugged in, and the outbound side can be fired by any input InputConfig reads, including your Mac's own keyboard and trackpad.
You have MIDI gear and want it to run your Mac
Notes, pads, knobs, sliders, pedals, the pitch wheel, aftertouch, and Program Change all become bindable inputs. A pad can send Command and C, a knob can scroll a page, and a sustain pedal can hold the left mouse button down so you can drag with your foot. Start at A MIDI device as your Mac's input.
You want to play a DAW from something other than a keyboard
Any control InputConfig reads can send MIDI to a music app through a virtual port the app creates for itself. Notes with velocity, control changes, pitch bend, Program Change, and transport commands all leave that port. Start at Sending MIDI out to a DAW.
Both directions can run at once. A knob on your MIDI keyboard can send a keyboard shortcut into macOS while a controller button plays a note into your DAW. InputConfig deliberately never connects to its own output port, so the two cannot loop back into each other.
A MIDI device as your Mac's input
Five kinds of MIDI message can drive a binding. Everything else on the row works the way it does for a controller button.
Connect the device over USB or Bluetooth MIDI. InputConfig finds it on its own, with no setup and no drivers. Open a preset, add a binding, set its input type to MIDI, then press Scan and play a key, twist a knob, or move the pitch wheel. The control you touched is captured into the row.
From there the binding behaves like any other. It can send a key, a mouse click, mouse motion, scroll, a typed phrase, a macro, a Siri Shortcut, or a system function. The full catalogue is on the bindings page.
| Message | What it is on your gear | How the binding reads it |
|---|---|---|
| Note | Keys and drum pads | Held like a button. The binding fires while the key is down and releases when it lifts. |
| Control Change | Knobs, sliders, pedals, the mod wheel | Continuous, 0 to 127. One of three knob modes decides what that value means. |
| Pitch Bend | The bend wheel or lever | Centre resting, read as a bipolar axis. Bind the plus or the minus direction, the way you would a stick. |
| Program Change | Patch select buttons | Fires once, momentarily, each time the patch changes. |
| Aftertouch | Pressing harder into a key you are already holding | Channel pressure, continuous. It is per channel, not per note. |
Polyphonic key pressure, which is the per note version of aftertouch, is not read, and neither is system exclusive. If your keyboard sends poly pressure, bind channel aftertouch instead.
The three knob modes
A Control Change value is just a number from 0 to 127. The knob mode is what turns that number into a press, a speed, or a nudge.
Every CC binding carries a knob mode, picked from the channel menu on its row. The setting only applies to Control Change; notes, pitch bend, aftertouch, and Program Change ignore it. Pick the one that matches the physical control you are turning.
- Switch (past halfway)
- The default, and the right choice for anything that is really an on and off control. The binding fires once the value passes the halfway point and releases when it falls back below. A sustain pedal behaves as a plain switch this way, and so does a knob you only ever turn all the way one direction or the other.
- Dial (speed from centre)
- Treats the middle of the knob's travel, value 64, as zero. The further you turn away from centre, the faster the bound output runs; which side you turn to picks the direction. The binding's deadzone keeps it quiet near centre. This is a stick axis in knob form, so it pairs naturally with mouse motion and mouse wheel outputs: scrolling that speeds up the further you push the mod wheel, and stops when you let it fall back to centre.
- Turn (nudge per step)
- Fires the outputs as short pulses as the knob moves, clockwise counting as the plus direction and counterclockwise as minus. Nothing happens while the knob sits still. This is what you want for volume, brightness, and stepped scrolling, and it is the mode that makes an endless encoder useful, since the outputs follow the movement rather than the value.
Turn Step
Turn mode has one setting of its own, Turn Step, in the same menu. It sets how much rotation counts as one nudge, so a knob that feels twitchy can be slowed down and a knob that feels sluggish can be sped up.
- Fine
- 2 units per nudge. The most sensitive setting, for long throw knobs and fine adjustments.
- Normal
- 4 units per nudge. The default.
- Coarse
- 8 units per nudge.
- Chunky
- 16 units per nudge. The fewest nudges per turn, for jumping through a list quickly.
Three things people build with these
- Scrolling that follows the knob. Bind the CC in Dial mode, plus direction, to a Mouse Wheel output, then add a second binding on the same CC in the minus direction for the other way. Return the knob to centre and the scrolling stops.
- A hardware volume knob. Bind the CC in Turn mode, plus direction, to Volume Up, and a second Turn binding in the minus direction to Volume Down. System functions fire once per press, which is exactly one nudge, so every few steps of rotation moves the volume one notch.
- Arrow keys on a dial. The same Turn recipe pointed at the Right Arrow and Left Arrow keys steps through a photo library, a slide deck, or a list of flashcards.
Keeping two devices apart
Every binding carries a MIDI channel filter and a device filter, and both default to any.
Any channel and any device is what most people want. It means a preset keeps working when you unplug one keyboard and plug in another, and it means a preset you share with someone else works on their gear without editing.
Pin a binding to a specific channel when one device sends on several at once. The common case is splitting a keyboard: set the lower octaves to a channel of their own and bind those to Mac shortcuts, while the rest of the keyboard stays on its usual channel and keeps playing your music software untouched. Channels are numbered 1 to 16 the way they are printed on hardware.
Pin a binding to a device when you have two pieces of MIDI gear connected and want each one doing its own job. The device menu lists everything InputConfig currently sees by name, which doubles as the fastest way to confirm your keyboard was detected at all. If the list says no MIDI devices are detected, the problem is the connection, not the binding.
A knob as a real volume fader
Turn mode nudges the volume a step at a time. The System Volume output does something different: it follows the knob.
Set a CC binding's output to System Volume (follows input) and the Mac's output level tracks the control's position one to one. Knob at the bottom is silence, knob at the top is full, and every position in between lands where you would expect. There is no press threshold involved, so the whole sweep of the control is live, not just the half above the midpoint.
It works from more than a knob. The pitch wheel, aftertouch, and a game controller's analog triggers all feed it, because all of them report a position rather than a press.
Activating a preset never jumps the volume
When the preset activates, InputConfig records where the control is resting and does nothing with it. The fader only takes over once the control has moved about 2 percent of its travel away from that baseline. So a knob left at the top from yesterday does not slam the volume to full the moment you switch presets. Moving the control is the consent.
Sending MIDI out to a DAW
Whenever InputConfig is running it publishes a virtual MIDI source named InputConfig. Any app that lists MIDI inputs can see it.
You do not need an IAC bus, a loopback utility, or any extra setup. The port exists because the app is open. Its identity is saved the first time it is created and reused after that, so a DAW that has been told to listen to InputConfig still finds it after a restart.
Open your music app
Logic, Ableton Live, GarageBand, MainStage, Bitwig, or anything else that accepts a MIDI input.
Find its MIDI input settings
Depending on the app this is called MIDI inputs, external controllers, or control surfaces.
Enable InputConfig as a source
It is listed by that name. If it is missing, check that InputConfig is actually running, then reopen the settings pane so the app rescans.
Arm a track that listens to it
Select or record-arm the track you want to play, the same as you would for a hardware keyboard.
Activate a preset with MIDI bindings and play
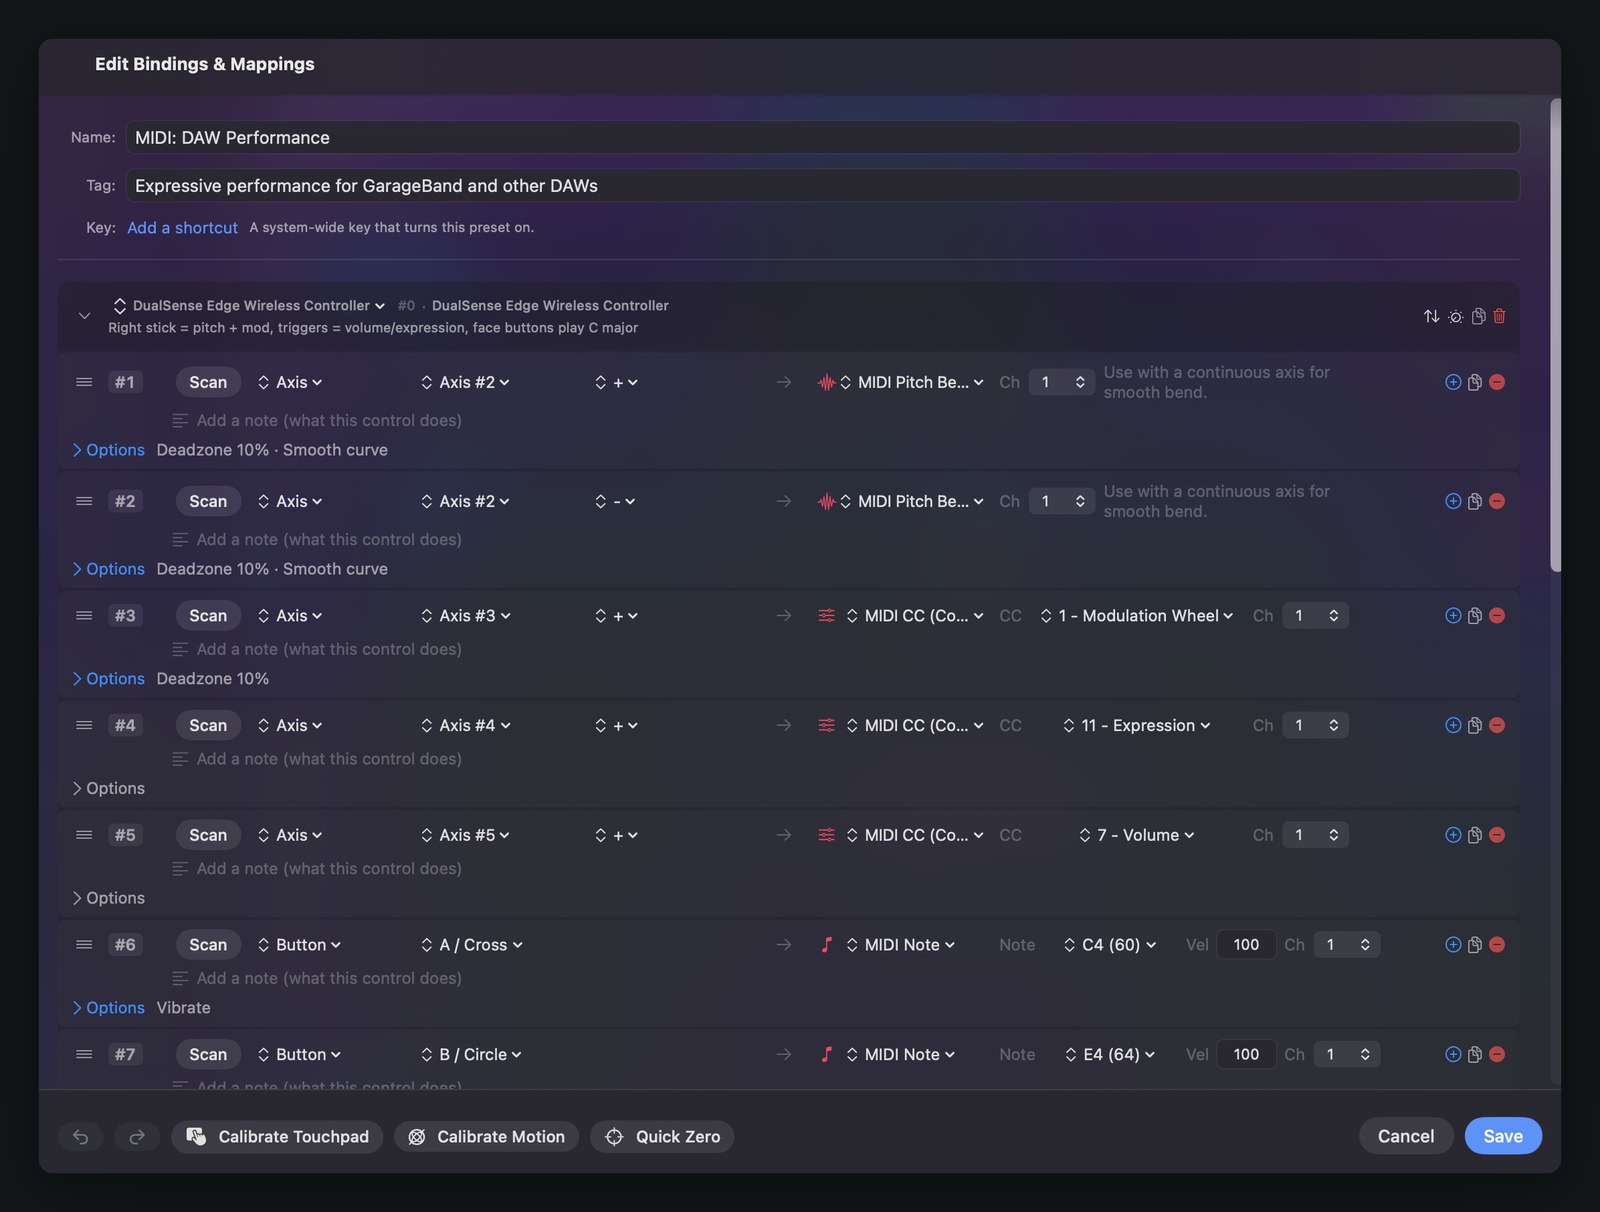
Nothing is sent until a preset is active. MIDI: DAW Performance is a good one to start on, since every row is already pointed at the port.
What a binding can send
- MIDI Note
- A single note, played on press and stopped on release. Pick the note from C-1 to G9, type a velocity, and set the channel from 1 to 16. Four face buttons become a chord or a small drum kit.
- MIDI CC (Control Change)
- Any CC number on any channel. Eighteen of the common ones are named in the picker, including Modulation Wheel, Volume, Expression, Pan, Sustain Pedal, Resonance, and Cutoff Frequency, and the rest are listed by number. Pointed at a stick or a trigger with Variable Sensitivity turned on for that row, the value follows how far the control is pushed.
- MIDI Pitch Bend
- The full 14 bit bend. Centre holds 8192, full positive sends 16383, full negative sends 0. Bind the plus and minus directions of one stick axis for natural bending in both directions.
- MIDI Program Change
- Program 0 to 127, sent on a press, to recall a patch, a drum kit, or an instrument bank on the receiving side.
- MIDI Transport
- Start, Stop, and Continue, the real time playback commands. One button each gives you hardware transport control without reaching for the DAW window.
If a note hangs
Deactivating a preset and hitting the emergency stop run the same cleanup: a note off for every note InputConfig is holding, then All Notes Off and Reset All Controllers on all sixteen channels, and a pitch bend recentre. The same cleanup runs when the Mac goes to sleep and when a controller drops off mid press, which are the two moments a note would otherwise be left sounding. The emergency stop only ever stops, never starts, so it is safe to reach for when you are not sure what is happening.
The MIDI presets that ship
Six of the 31 built-in presets live in the MIDI & Creative folder. Four of them send MIDI out to a music app, and two read MIDI in to run the Mac.
- MIDI: DAW Performance
- Expressive performance for GarageBand and other DAWs. The right stick drives pitch bend and the mod wheel, the triggers send volume and expression, and the face buttons play a C major chord.
- MIDI: Drum Pad
- Finger drumming. The face buttons play kick, snare, closed hat, and open hat on channel 10, all with turbo on so holding a button rolls a fill, and the triggers add two more percussion notes.
- MIDI: Transport Control
- A DAW remote. Three face buttons send Start, Stop, and Continue, the two bumpers recall the first two patches with Program Change, and the D-pad pushes channel volume to full or down to zero.
- MIDI: Knob Deck
- MIDI as input, with no controller involved. It exercises all three knob modes at once: CC 7 as a volume fader, the mod wheel scrolling in Dial mode, a knob nudging the arrow keys in Turn mode, the sustain pedal holding a left click, and two pads sending Return and Escape.
- MIDI: Media Deck
- Pads and knobs running the Mac itself. Pads cover play and pause, next and previous track, mute, Mission Control, and opening the Music app, while two Turn mode knobs step volume and brightness and a third knob works as the volume fader.
- MIDI: CC Dials
- Sticks and triggers turned into soft MIDI controllers on channel 1. Every axis is a control change, which makes it the fastest preset to hand to a DAW's MIDI Learn when you want a controller driving plugin macros.
All six are starting points rather than finished setups. Duplicate one, open it, and change the CC numbers, notes, and channels to match your own gear. How the library, the folders, and the Smart Preset Maker fit together is covered on the presets page.
Seeing it live
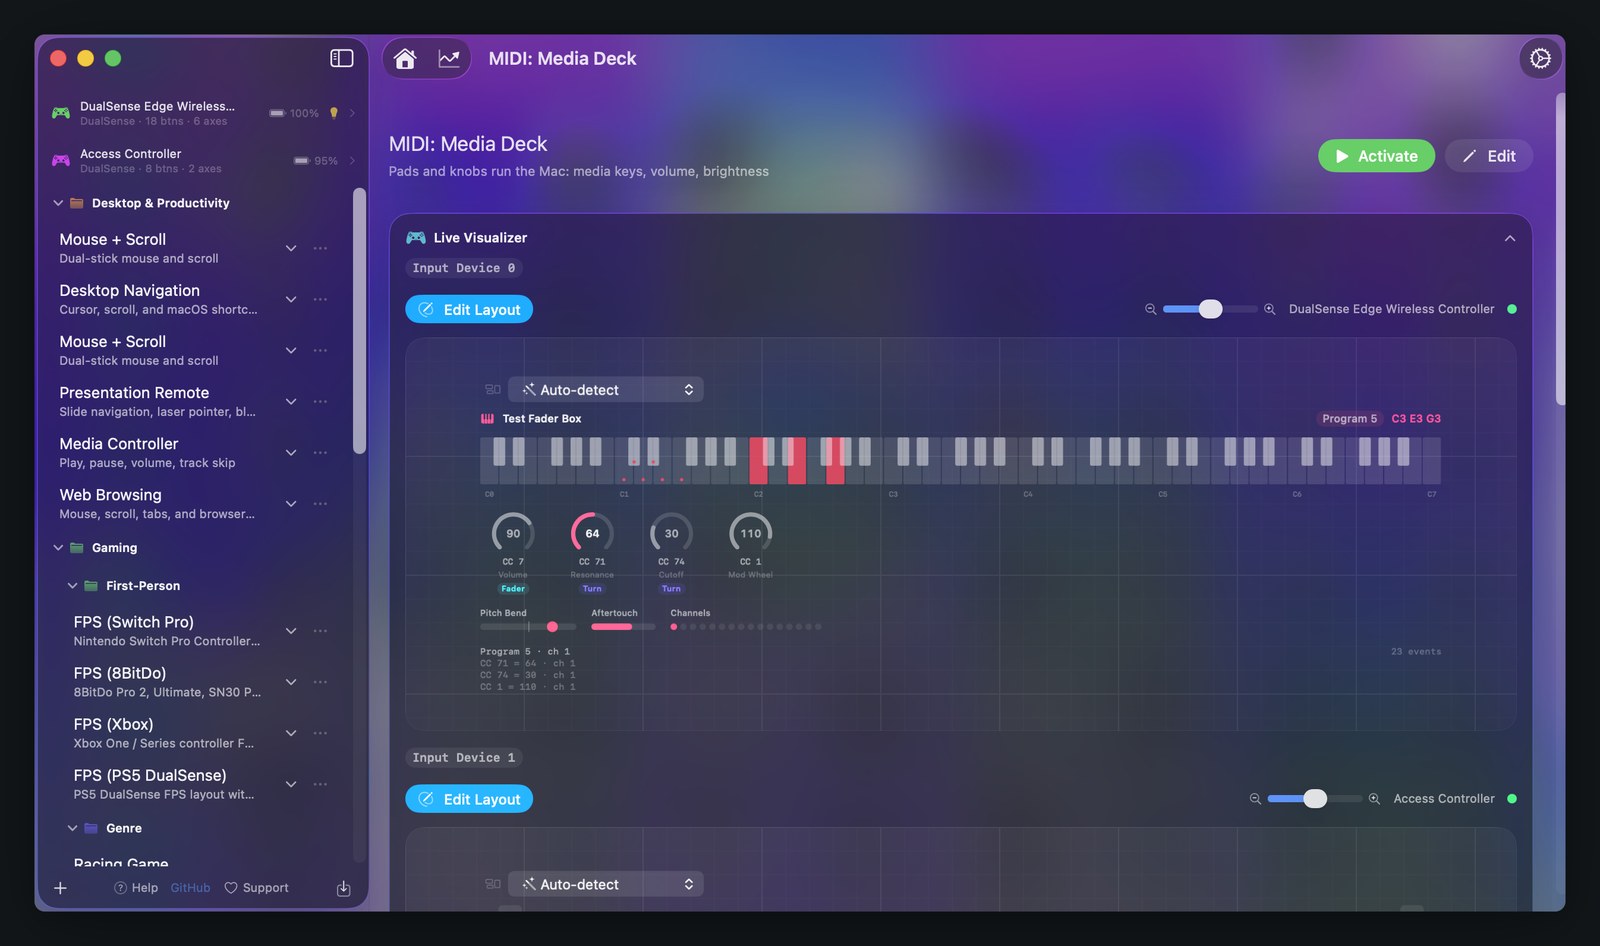
The Live Visualizer has a MIDI instrument layout, and it picks that layout by itself when a preset's bindings are MIDI.
The layout is built to answer the question you actually have, which is whether the message you think you are sending is the message arriving. It shows a seven octave keyboard with octave labels, shaded by velocity as you play and dotted on the notes a binding is watching. Every knob you have bound gets a dial of its own, and so does any knob the hardware sends that no binding is watching yet, up to sixteen of them. Each dial is labelled with the control's real name, so CC 74 reads as Cutoff rather than as a number, and a bound dial carries a badge naming what it is doing: Switch, Dial, Turn, or Fader when it is driving the system volume. Pitch bend and aftertouch get meters of their own, sitting beside a strip of all sixteen channels that lights the ones with traffic on them.
Under that is a rolling event log listing the last messages that came in with their values and velocities, which is the fastest way to find out that a knob you thought was on CC 71 is really on CC 72. The panel renders at rest before anything is connected, so you can lay a preset out before the gear arrives, and clicking any key or dial opens the binding behind it with a jump straight to that row in the editor.
The visualizer draws one panel per device slot, so a MIDI instrument and a game controller can sit in the same window at the same time, each with the layout that suits it.
Where to go next
Bindings
Every input InputConfig reads, every output it can send, and the options on a single row.
Presets
The built-in library, folders, per-app switching, and the Smart Preset Maker.
Setup
Connecting hardware, the Accessibility permission, and activating your first preset.
Documentation
The full guide index for InputConfig 1.4.